Electron 개발해보기!

일렉트론 개발 환경 셋팅이 끝났으니 이제 간단한 데스크탑 앱을 만들어서 테스트를 해보자..!
일렉트론을 공부해보며 만들어볼 앱은 파일공유 앱이다.
리눅스와 윈도우 환경을 왔다갔다하며 개발을 하는지라 서로 다른 os간에 간편한 파일 공유 시스템이 필요했다.
그래서 이번 기회에 한 번 만들어 보는걸로..!
우선은 electron-quick-start에서 main을 그대로 카피해보자!
function createWindow () {
  // Create the browser window.
  mainWindow = new BrowserWindow({width: 800, height: 600, icon: path.join(__dirname, 'app/img/icon.png')});

  // and load the index.html of the app.
  mainWindow.loadURL(url.format({
    pathname: path.join(__dirname, 'app/upload.html'),
    protocol: 'file:',
    slashes: true
  }));

  // Open the DevTools.
  // mainWindow.webContents.openDevTools()

  // Emitted when the window is closed.
  mainWindow.on('closed', function () {
    // Dereference the window object, usually you would store windows
    // in an array if your app supports multi windows, this is the time
    // when you should delete the corresponding element.
    mainWindow = null;
  });
  const menu = electron.Menu.buildFromTemplate(template);
  mainWindow.setResizable(false);
  mainWindow.setMenu(menu);
}
리사이즈는 필요없으니 false값을 넣고 아이콘은 적당히 만들어서 경로를 잡아줬다.
menu는 upload와 download 2개만 필요하니 아래와 같이 작성하여 createWindow전에 선언한다.
const template = [
  {
    label: 'Upload',
    click () {
      mainWindow.loadURL(url.format({
      pathname: path.join(__dirname, 'app/upload.html'),
      protocol: 'file:',
      slashes: true
      }));
    }
  },
  {
    label: 'Downlaod',
    click () {
      mainWindow.loadURL(url.format({
      pathname: path.join(__dirname, 'app/download.html'),
      protocol: 'file:',
      slashes: true
      }));
    }
  }
];
그런데 여기서 한 가지 궁금한 점이 생겼다… 페이지 전환을 저런 방식으로 menu를 통해 main 프로세스에서 처리해도 옳은 방식일까..?
기본 문서를 봐도 적당한 예제가 없고 일단은 제대로 작동하니 pass!
다음은 업로드 페이지를 작성하자….
<!DOCTYPE html>
<html>
  <head>
    <meta charset="UTF-8">
    <link rel="stylesheet" href="index.css">
    <title>Dropbox</title>
  </head>
  <body>
    <div id="dropbox" draggable="true">
      <div><h2>Drop your file</h2></div>
      <progress></progress>
    </div>

    <script>
      // You can also require other files to run in this process
      require('./upload.js')
    </script>
  </body>
</html>
이제 업로드된 데이터를 전송할 js부분을 작성!
dropbox.ondrop = function (e) {
    e.preventDefault();
    let data = e.dataTransfer;
    let file = new FormData();
    flag=false;
    for (let i = 0; i < data.files.length; i++) {
        file.append('file', data.files[i]);
        if(i==data.files.length-1) flag=true;
    }
    if(flag)
    $.ajax({
        url: 'http://sodeok.xyz:8002/upload',
        type: 'POST',
        data: file,
        cache: false,
        contentType: false,
        processData: false,
        xhr: function() {
            var myXhr = $.ajaxSettings.xhr();
            if (myXhr.upload) {
                myXhr.upload.addEventListener('progress', function(e) {
                    if (e.lengthComputable) {
                        $('progress').attr({
                            value: e.loaded,
                            max: e.total
                        });
                    }
                } , false);
            }
            return myXhr;
        },
        success:function(data){
            if(data=="ok")
            $('progress').attr({
                value: 0,
                max: 0
            });
        }
    });
};
드래그 앤 드롭으로 들어오는 파일의 길이만큼 각각의 파일을 FormData에 넣어서 서버로 전송한다!
이렇게 전송된 파일을 이제 다운로드 할 수 있는 페이지를 작성해보자!
<!DOCTYPE html>
<html>
    <head>
        <meta charset="UTF-8">
        <link rel="stylesheet" href="index.css">
        <title>Dropbox</title>
    </head>
    <body>
        <div id="dropboxDownload">
        </div>
        <script>
            // You can also require other files to run in this process
            require('./download.js')
        </script>
    </body>
</html>
이제 다운로드 리스트를 가져와서 보여주는 스크립트를 작성하자
window.$ = window.jQuery = require('jquery');
$(document).ready(function(){
    $.ajax({
        url: 'http://sodeok.xyz:8002/list',
        type: 'POST',
        success:function(data){
            if(data!="[]"){
                let json=JSON.parse(data);
                for(let i=0;i<Object.keys(json).length;i++){
                    let list="<a href='http://sodeok.xyz:8002/download/"+String(json[i]["code"])+"'><div class='file'><img src='img/file.png' /><span>"+ String(json[i]["filename"]) + "</span></div></a>";
                    $("#dropboxDownload").append(list);
                }
            }
            else $("#dropboxDownload").html("<h2>공유 파일이 존재하지 않습니다!</h2>");
        }
    });
});
서버로부터 다운로드 code만 받아와서 download/+code url로 접속시 파일을 다운로드 할 수 있게끔 하였다.
그래서 dropboxDownload에 이어붙일때도 그냥 a태그로 접속하게끔한다.
텍스트만 보이는 허전함을 피하기위해서 file 이미지도 같이 삽입한다..!
서버단에서 저장시 확장자도 구별하기에 확장자 별로 다른 이미지를 보이게끔한다면 더 깔끔할 것이다. 하지만 지금은 귀찮으니 생략!
코드를 다 작성한다음 npm start를 통해 프로그램을 실행시켜봤다.

업로드 화면
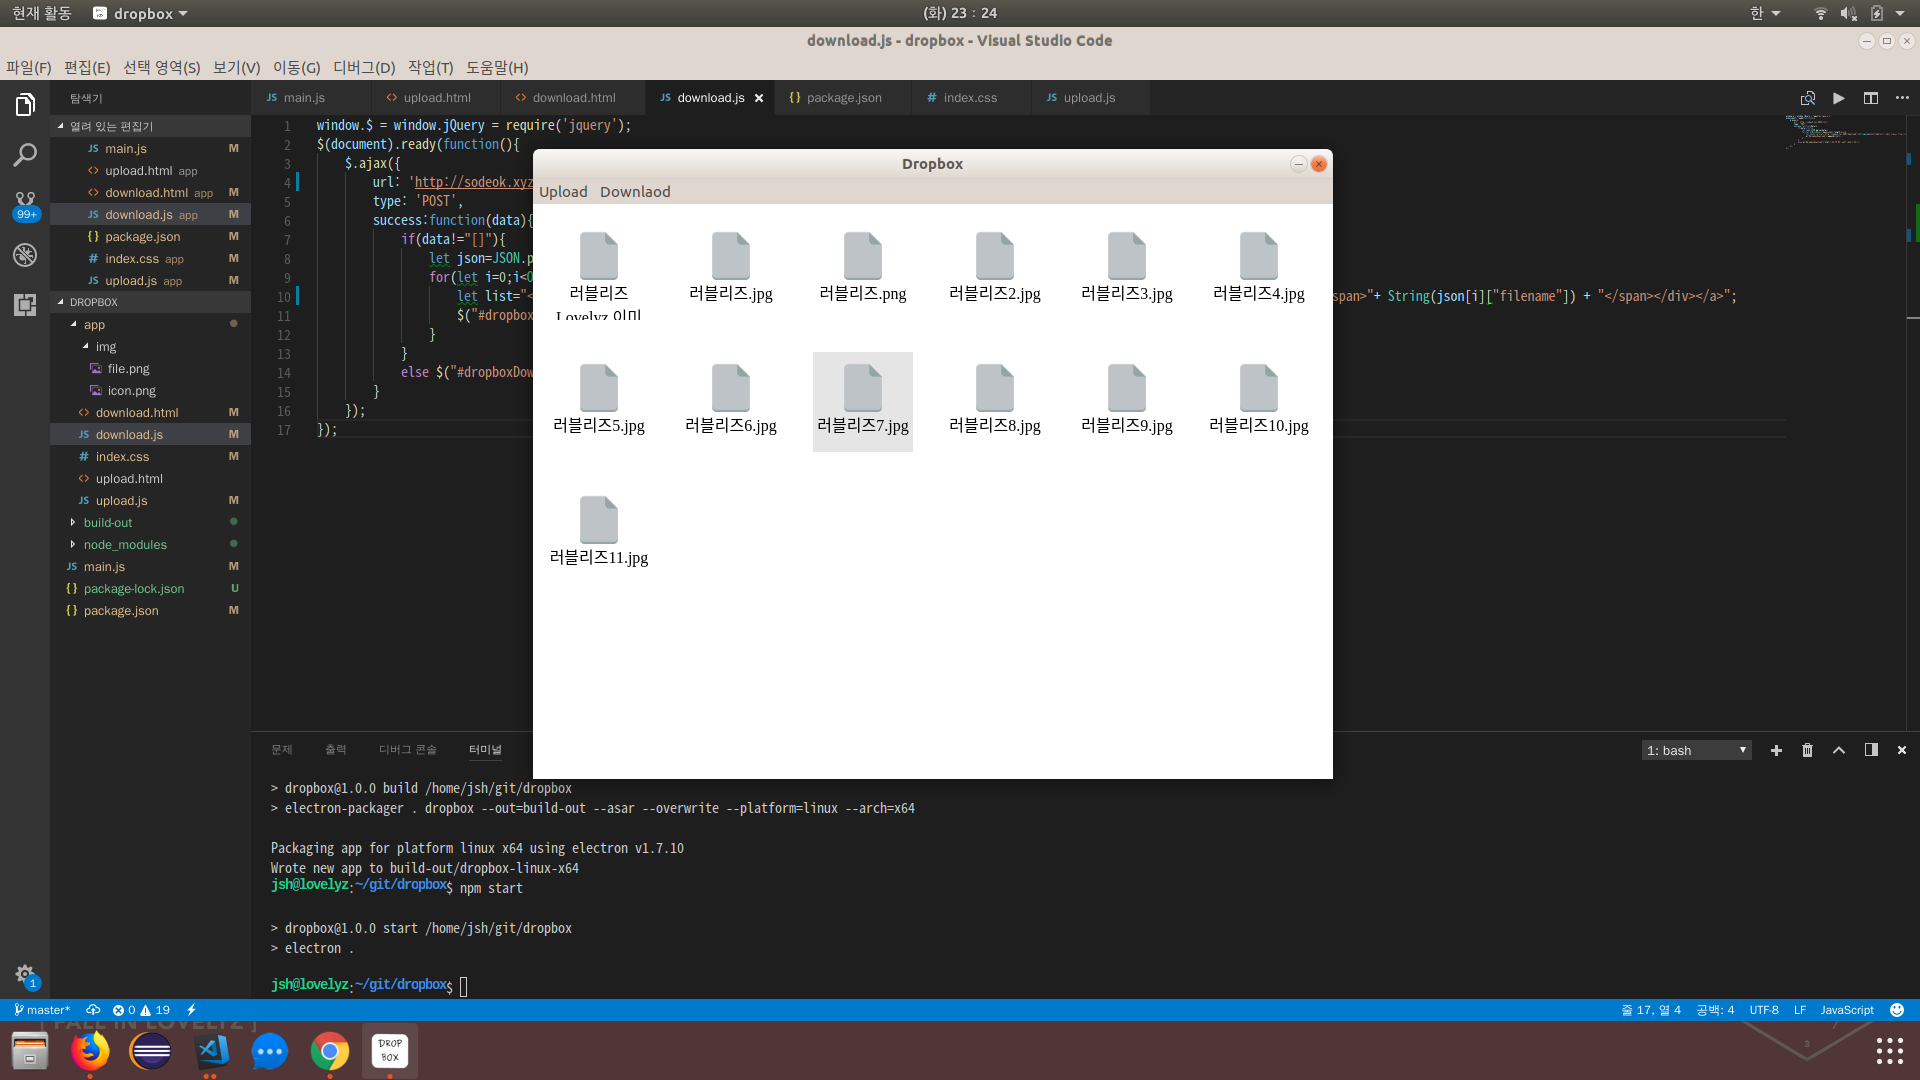
다운로드 화면
앱이 성공적으로 잘 돌아간다..! 상당히 조잡하지만 간단하며 기본에 충실하게끔 만들었다.
무엇보다 웹언어로 이렇게 데스크탑 앱을 만들 수 있다는게 놀라운 따름이다.
이제 마지막으로 배포를 해봐야겠다.
배포를 위해서 서드파티 중 electron-packager를 사용하였다.
$ npm install --save-dev electron-packager이제 package.json에 script를 추가하자!
"build": "electron-packager . dropbox --out=build-out --asar --overwrite --platform=linux --arch=x64"–out 옵션은 배포가 될 폴더를 설정하는것이고 –asar 옵션은 배포 시 asar로 압축하여 코드가 노출되지 않게끔 한다. (electron은 asar 포맷을 압축해제 없이 읽어들일 수 있다고 한다.)
–platform=linux –arch=x64 옵션은 각각 플랫폼과 비트이다.
본인은 우분투 64비트 환경을 사용해서 리눅스와 x64 아키텍쳐를 설정했다.
플랫폼의 경우 맥은 darwin 윈도우는 win32 리눅스는 linux이다.
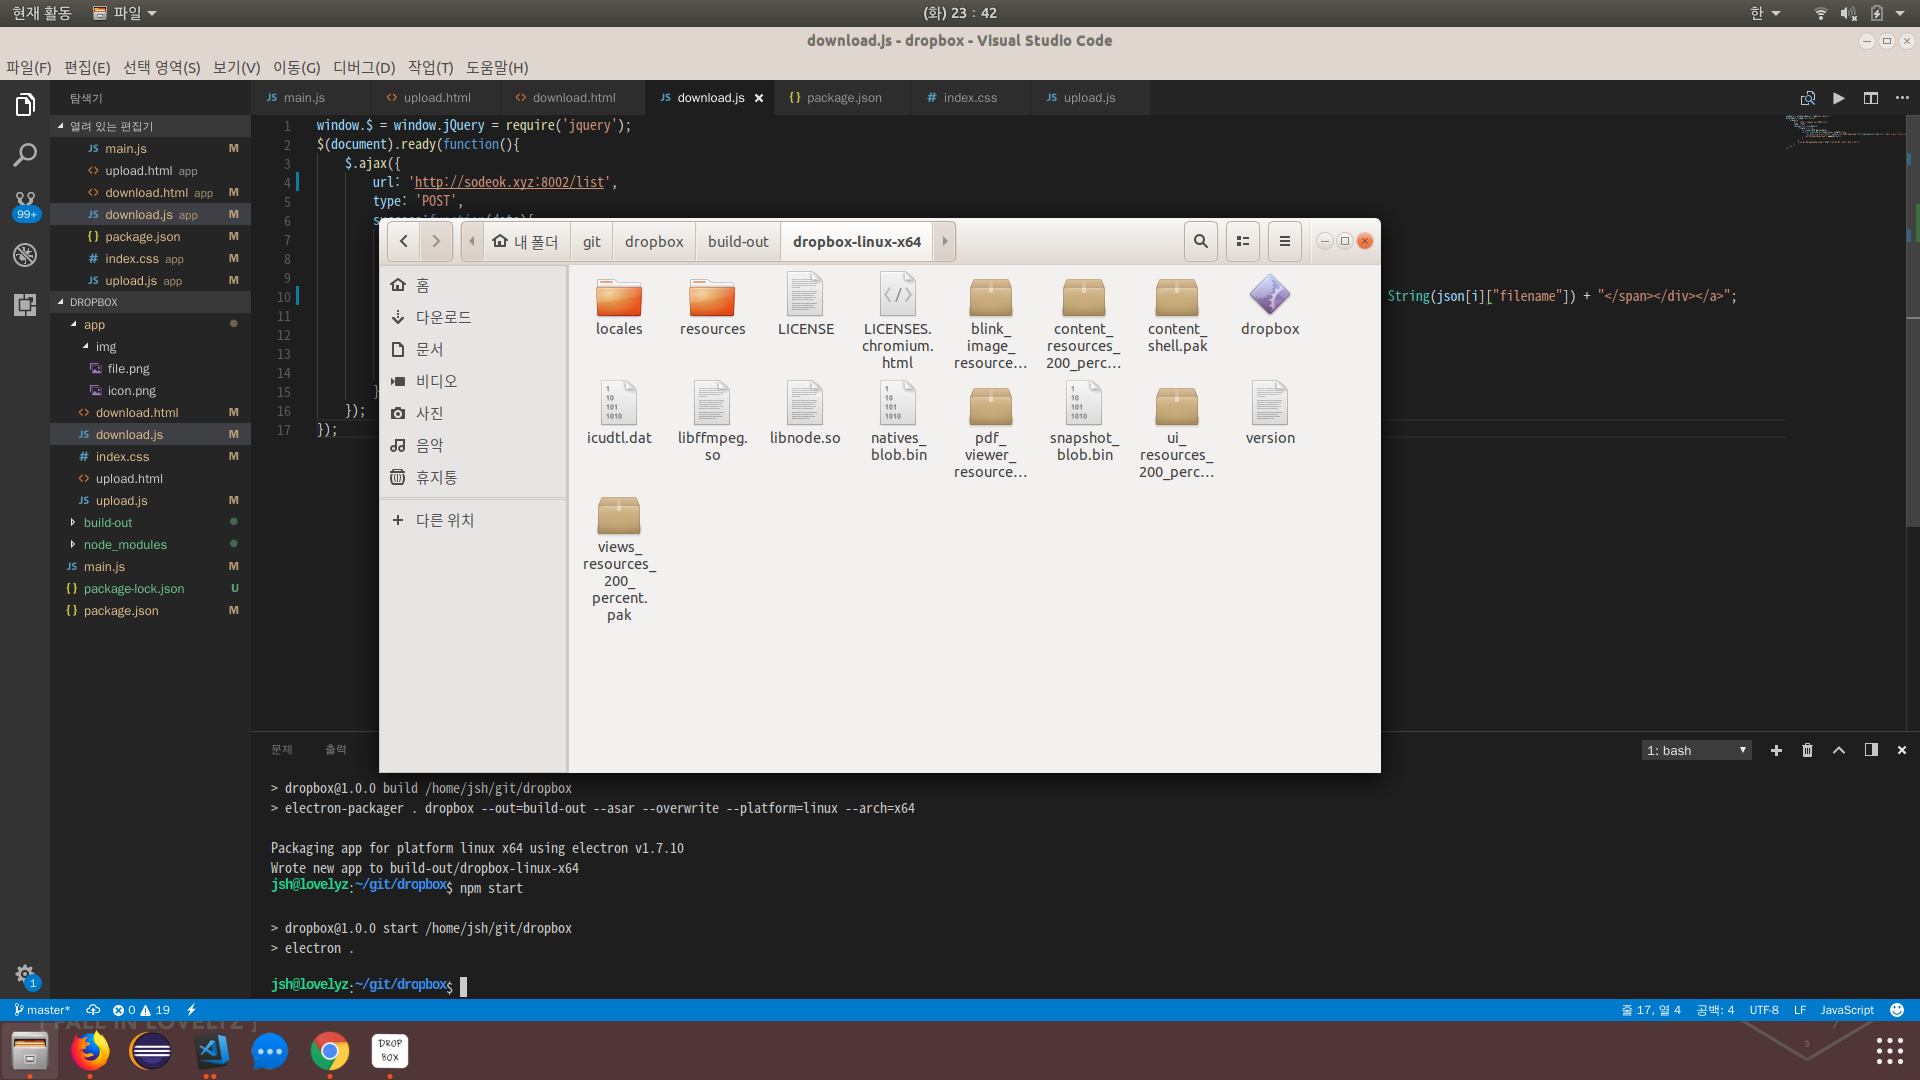
이후 npm run build를 통해 배포를 해보니 build-out 밑에 dropbox-linux-x64가 생성되었으며 들어가보니 배포가 잘 되었다!
이제 exe파일로도 배포를 하여 윈도우에도 설치를 해야겠다.
Comments