트위터 이미지 크롤러 만들기 Twitter Image Crawler

내 개인서버에는 여러 종류에 크롤러가 구동되고 있다. 러블리즈 이미지 크롤러랑 디시인사이드 키워드 크롤러 등…
이번 시간에는 그중에서도 이미지 크롤러 특히 소스가 풍부한 트위터에 대한 이미지 크롤러를 공유하고자 한다!
공식 api를 사용하는 방법보다는 api없이 크롤링하도록 구현했다.
일단은 환경 셋팅을 위해 selenium, scrapy, pymongo, configparser를 설치해야한다.
#일괄 설치
$ sudo pip install configparser pymongo selenium scrapy
selenium은 공식 api없이 트위터를 크롤링 하기 위해서는 가장 핵심이 되는 key인 data-min-position을 구하기 위해서 사용한다.
사실 이전에 구현했던 크롤러는 selenium 없이 data-min-position을 구해서 받아왔지만 최근 다시 확인해본 결과 data-min-position값이 동적으로 생성되어 받아오기 힘들게 되어있다.
Data-min-position?
트위터의 구조를 살펴보면 검색 시 보여지는 타임라인 화면은 data-max-position값과 data-min-position값 사이에 위치한 트윗들을 보여주는 구조이다.
그래서 우리는 selenium으로 data-min-position값을 구해서 다음 url요청시 data-min-position값을 data-max-position값으로 넣어줘서 계속 새로운 트윗들을 얻어올 수 있다.
이때 새로운 문서 url을 요청하기 위해서 scrapy를 사용한다. 사실 selenium을 사용한 시점에서 scrapy 없이 충분히 크롤러 구현이 가능하지만 원래 소스가 scrapy로 구현된거에 그냥 selenium을 추가한것이므로 그냥 진행하도록한다.
Scrapy이란

python으로 만들어진 오픈소스 web crawling framework이다.
상당히 쉽게 조작할 수 있고 문서도 잘 정리되어 있어서 크롤링시 많이 사용되는 프레임워크다.
자세한 내용은 https://scrapy.org
이제 scrapy를 사용해보자
$ scrapy startproject twitter제대로 생성이 되었으면 twitter scrapy는 아래와 같은 구조를 같게 된다.
twitter/
    scrapy.cfg            # deploy configuration file

    twitter/             # project's Python module, you'll import your code from here
        __init__.py

        items.py          # project items definition file

        middlewares.py    # project middlewares file

        pipelines.py      # project pipelines file

        settings.py       # project settings file

        spiders/          # a directory where you'll later put your spiders
            __init__.py
실제로 크롤링에서 메인로직을 담당하게 될 부분은 spiders 밑에 있는 image_spider.py가 될 것이다.
그전에 먼저 크롤링시 메타데이터를 몽고디비에 저장할것이기 때문에 pipelines.py부터 수정해준다.
class MongoDBPipeline(object):

    def __init__(self):
        connection = pymongo.MongoClient(
            settings['MONGODB_SERVER'],
            settings['MONGODB_PORT']
        )
        db = connection[settings['MONGODB_DB']]
        self.collection = db[settings['MONGODB_COLLECTION']]

    def process_item(self, item, spider):
        valid = True
        for data in item:
            if not data:
                valid = False
                raise DropItem("Missing {0}!". format(data))

        if valid:
            self.collection.insert(dict(item))
            log.msg("Twitter Data added to MongoDB database!",
                    level=log.DEBUG, spider=spider)

        return item
그런 다음 settings.py에서 mongodbpipeline을 사용하도록 설정한다.
이때 몽고디비 주소와 포트, 디비명, 컬렉션명 설정이 필요하다.
잘 모르겠다면 sudo apt-get install mongodb-clients mongodb-server을 통해 몽고디비를 설치만 해두어도 작동하는데 아무런 이상이 없다.
BOT_NAME = 'twitter'

SPIDER_MODULES = ['twitter.spiders']
NEWSPIDER_MODULE = 'twitter.spiders'

ITEM_PIPELINES = {'twitter.pipelines.MongoDBPipeline': 300,}

MONGODB_SERVER = "localhost"
MONGODB_PORT = 27017
MONGODB_DB = "crawler"
MONGODB_COLLECTION = "twitter"

ROBOTSTXT_OBEY = False

DOWNLOAD_DELAY = 0.5
이제 image_spider.py를 작성하자!
image_spider.py는 아래와 같이 구성된다.
class ImageSpider
    #크롤러 시작
    def start_requests
    #크롤링 리스트 파싱 후 parse_img 호출, data-min-position을 이용하여 다음 url 계산하여 재귀
    def parse
    #이미지 저장 및 메타데이터 저장
    def parse_img
우선은 class ImageSpider전에 config파일과 selenium을 로드하자
Config.read('./setting.conf')
keyword = Config.get('twitter', 'keyword')
page = Config.get('twitter', 'page')
rootpath= Config.get('twitter', 'rootPath')

options = webdriver.ChromeOptions()

options.add_argument('headless')
options.add_argument('window-size=1920x1080')
options.add_argument("disable-gpu")

options.add_argument("user-agent=Mozilla/5.0 (X11; Linux x86_64) AppleWebKit/537.36 (KHTML, like Gecko) Chrome/63.0.3239.132 Safari/537.36")

driver = webdriver.Chrome(rootpath+'chromedriver', chrome_options=options)

driver.implicitly_wait(3)
conf파일에서 미리 검색할 키워드와 페이지 그리고 크롤러가 위치한 절대경로를 받아온다.
selenium은 지난번에 했던 방식과 같이 headless모드로 구동한다.
class ImageSpider(scrapy.Spider):
	name = "twitter"
	def start_requests(self):
		urls = ['https://twitter.com/search?q='+keyword+'&src=typd&lang=ko&max_position=']
		for url in urls:
			yield scrapy.Request(url=url, callback=self.parse)

	def parse(self, response):
		driver.get(response.url)
		#static img
		for link in driver.find_elements_by_css_selector('div.js-adaptive-photo'):
			next_post = link.get_attribute('data-image-url')
			client = MongoClient('localhost', 27017)
			db = client.crawler
			collection = db.drop
            #이미 수집된 url 무시!!
			flag = collection.find({"_id": next_post}).count()
			if(flag == 1):
				print next_post
				pass
			else:
				collection.insert({"_id": next_post, "num": int(time.time() * 1000)})
				yield scrapy.Request(next_post, callback=self.parse_img)
			client.close()

		#gif
		for link in driver.find_elements_by_css_selector('div.PlayableMedia-player video'):
			next_post = link.get_attribute('src')
			client = MongoClient('localhost', 27017)
			db = client.crawler
			collection = db.drop
            #이미 수집된 url 무시!!
			flag = collection.find({"_id": next_post}).count()
			if(flag == 1):
				print next_post
				pass
			else:
				collection.insert({"_id": next_post, "num": int(time.time() * 1000)})
				yield scrapy.Request(next_post, callback=self.parse_img)
			client.close()
		global cnt
		global page
		cnt += 1
		if cnt >= int(page):
			driver.quit()
			sys.exit()
		min_position = str(driver.find_element_by_css_selector('div.stream-container').get_attribute('data-min-position'))
		print response.url
		url = response.url.split('&max_position')[0] + '&max_position=' + min_position
		yield scrapy.Request(url, callback=self.parse)
위 코드를 보면 일반 jpg와 gif를 따로 구하고 있는데 트위터의 경우 정적 이미지와 gif이미지의 태그가 틀리다.
일반 정적 이미지의 경우 div.js-adaptive-photo로 접근하여 이미지 주소를 추출할 수 있고 gif의 경우는 div.PlayableMedia-player video로 접근하여 주소를 추출해야 한다.
그런 다음 driver.find_element_by_css_selector(‘div.stream-container’).get_attribute(‘data-min-position’)을 통해 min-position을 구한 다음 url을 계산하여 자기 자신을 호출한다.
cnt값이 page보다 커질경우 크롤러를 강제종료하는데 page(즉, min-position을 계산하여 다음 url로 넘갈때를 한페이지로 계산한다.) 이부분이 없으면 해당 키워드에 대해 끝까지 크롤링 할 수 있다.
한가지 특이한점은 gif이미지가 실제로는 mp4로 올라와있기 때문에 video태그로 접근해야한다. 용량이 큰 실제 vedio의 경우에는 blob 타입으로 제공되며 parse_img에서 저장할 수 없다.
용량이 큰 동영상에 대해서는 blob 객체를 좀 공부해보고 어떻게 저장할지 생각좀 해봐야겠다. 일단 여기선 패스!
	def parse_img(self, response):
		img = response.url
		num = int(time.time() * 1000)
		if img is not None:
			tmp = img
			name = tmp.split('/')[4]
			ext = tmp.split(".")[3]
			self.log(tmp)
			file_path = "%s%s" % (rootpath+"storage/tmp/", name)
			if not(os.path.exists(file_path)):
				urllib.urlretrieve(tmp, file_path)
				f = open(file_path, 'rb')
				hash_name = hashlib.md5(f.read()).hexdigest()
				hash_path = "%s%s" % (rootpath+"storage/twitter/", hash_name)
				if(os.path.exists(hash_path)):
					os.remove(file_path)
				else:
					os.rename(file_path, hash_path)
					yield {
						'_id': hash_name,
						'num': num,
						'ext':ext
					}
parse_img에 경우 이미 parse에서 완전한 이미지 url이 넘어왔기에 임시 경로에 이미지를 저장했다가 hash를 이용하여 다시 저장한다.
이렇게 구현한 이유는 중복된 이미지는 수집하지 않기 위해서이다.
저장이 완료되면 yield를 이용해 메타데이터를 몽고디비에 저장한다.
이렇게 만들어진 크롤러를 적절히 page값을 줘서 일정시간 마다 돌려주면 항상 최신의 이미지를 가져올 수 있다.
이제 scrapy crawl twitter을 통해 크롤러를 구동해보자.
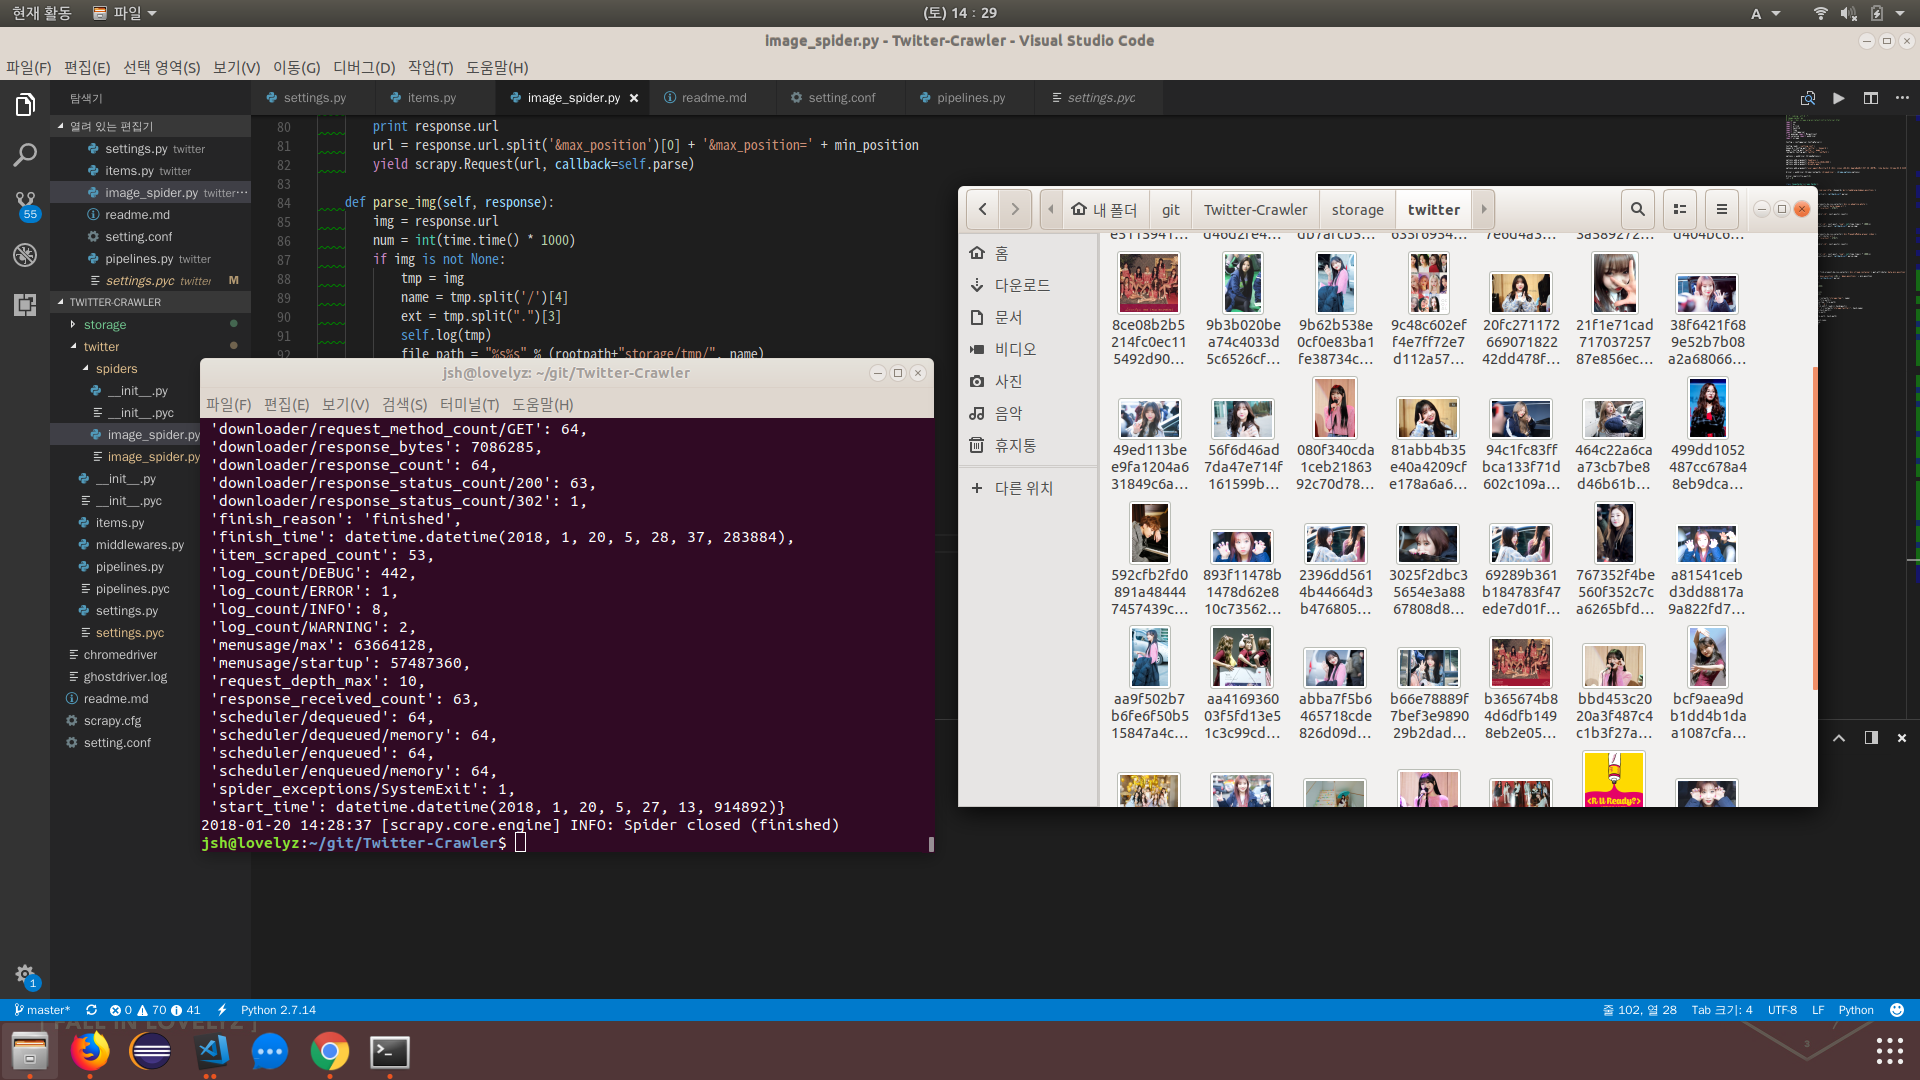
성공적으로 이미지를 크롤링한 것을 확인할 수 있다.
전체 소스는 트위터 이미지 크롤러에 있다.
Comments